Mowlid's Flat-Pack Loft
A 4 x 6 ft pigeon loft that bolts together in an afternoon, comes apart the same way, and stacks flat against the garage. Built for an Edmonton rental backyard.
What it looks like
Two AI-made pictures of the design with real-looking birds. Proportions are close, small details differ from the drawings. Where they disagree, the drawings win.
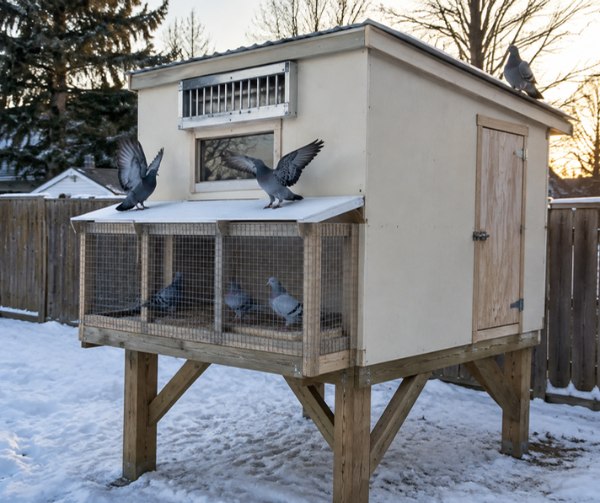
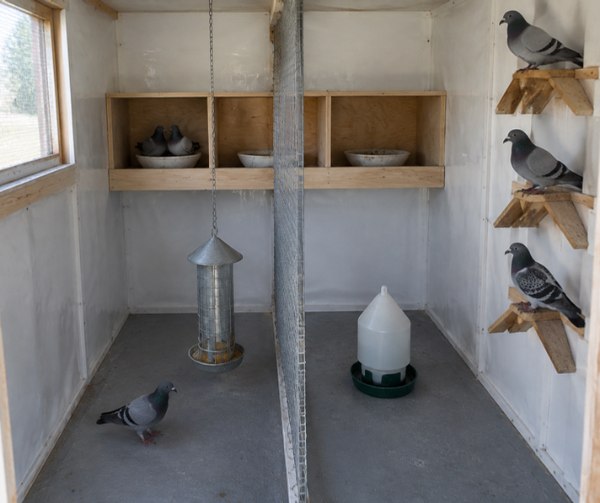
3D view
Slide it apart to see every piece. Tap a piece for its size, weight and what's on it.
Tap a piece
Walls are 2x2 frames with plywood outside, 1.5 inch foam in the middle and a washable plastic skin inside. Everything joins with 1/4 inch carriage bolts and wing nuts, so the only tool for assembly is your hands and one wrench.
Floor plan
Looking down from above. Front wall faces south so the landing board gets sun. The wire divider splits it into two 3 x 4 ft pens, one per type, each with its own door into the flight pen.
Each pen gets
- 3 nest boxes, 12 wide x 12 tall x 20 deep, with a 6 inch lip and plastic nest bowls
- 6 V perches on the side wall, one per adult bird
- Its own 8 x 8 pop hole to its half of the flight pen
- A hanging feeder, a waterer off the floor, and a grit pot
Why two pens
You said a mix of types. Homers in one pen, rollers or fancies in the other, and nothing cross-breeds. Pull the divider out and it is one 4 x 6 room again. When module 2 bolts on later you get four pens.
Panels and weights
Every piece is something one person can carry. Weights are estimates from the materials list, rounded up.
| # | Piece | Size (in) | Weight | What's on it |
|---|
Build: 2x2 spruce frame, 5.2 mm plywood outside, 1.5 inch EPS foam in the frame, 4 mm coroplast (sign plastic) inside so you can wash it. Floor halves are 2x4 joists with 1/2 inch plywood. Roof halves are 2x4 rafters, 2x2 purlins, corrugated steel on top, foam and coroplast underneath.
Warm, snow, wind
Warm no heater
Pigeon keepers in cold places agree on one thing: dry and draft free beats warm. Birds handle -30 fine if they are not wet and not in a breeze.
- 1.5 inch foam in every wall, the roof and the door (about R-5.6)
- Foam tape on the top plates where the roof lands. Walls bolt tight to each other
- Two vent slots, both with sliding covers: a low one at the front, a high one at the back. Winter: front a quarter open, back half open. Never fully shut, the ammonia has to leave
- Floor is 3 ft up on legs: dry underneath, nowhere for rats to nest against it, and you can mow under it
- Water: a heated dog bowl on an outdoor extension cord. Nothing else needs power
- Pair the birds up in March, not January
Snow built for 30 lb/sq ft
Edmonton's building code ground snow load is 1.5 kPa plus 0.2 kPa rain, which works out to about 29 lb per square foot on a roof like this.
- That is roughly 700 lb of snow on the whole roof
- Three 2x4 rafters per half, about 21 inches apart, spanning 4 ft: about 1.5 times the strength needed
- 3:12 slope toward the back, so drips and slides go away from the door and the pen
- Steel roofing laps one rib at the middle seam, the right half over the left
- After a big dump, push it off with a broom anyway. The front edge is about 10 ft up, a broom from a step ladder reaches
Wind anchored
I could not get the City's official wind figure, so the design just assumes strong prairie wind and ties the whole box down.
- Four screw-in auger anchors (the 15 inch dog tie-out kind) at the corners, cabled to eye bolts in the leg feet
- Every panel is bolted to its neighbours and the legs, so the anchors hold the roof too, not just the floor
- Standing 3 ft up catches more wind and gives it more leverage, so the legs get diagonal braces on all four sides and the anchors are not optional
- Back wall faces the windy side of your yard. Front faces south
- Roof overhang is only 5 inches, less for the wind to grab
- Nothing goes in the ground except the anchors, and they screw back out
Trap and flying
The one-way door (bob trap)
Same idea as your old coop. A 14 x 9 inch opening on the right front panel, 58 inches above the floor, which is about 8 ft above the ground now that the loft stands on 3 ft legs. That height is why you wanted it raised: the birds see the board from the sky, drop straight onto it and trap in fast, and nothing on the ground can bother them while they do. Seven aluminum bobs hang from a rod across the top, about 1.75 inches apart. A bird pushes in from outside, the bobs swing in and drop back behind it. From the inside they cannot swing out.
- Landing board outside: 24 x 14 inches, painted a light colour the birds can see from the sky
- A sliding drop door above the bobs. Open it and the birds go out over the board. Close it and the loft is in-only
- Inside, a 12 inch shelf so they land softly after the bobs
- Bob sets are sold online for roughly $35, or make them from 3/16 inch steel rod
When you are allowed to fly them (Bylaw 21244)
The flight pen counts as inside the loft, so the birds get sun and air all day without breaking any rule.
Put it together
First time about 3 hours. After that about 1.5 hours alone, 45 minutes with a friend. Tools: one 7/16 wrench, a level, a drill for the anchors.
- Pick the spot. Back yard only. 2 ft off the back fence, 3 ft off the side fence and the house. Back wall toward the wind, front toward the sun.
- Blocks and legs. Six patio blocks in two rows, 4 ft apart, the middle pair shared. Stand Legs A and Legs B on them, 2 bolts join the frames. Level with shims under the blocks.
- Floor A and B. Drop them on the leg rails. 2 bolts join the halves, 4 bolts down into the rails. The door sill is 3 ft up, so build a two-step wooden stair for the door side (two 18 inch risers, 2x10 treads). A stack of blocks is not safe at this height.
- Back wall A, then B. Stand each on the back edge of the floor, 2 bolts down through the bottom plate. 3 bolts between A and B.
- Side walls. Left side: 3 bolts into Back A's corner post, 2 into the floor. Right side the same.
- Front A and B. 3 bolts to each side wall, 3 between them, 2 each into the floor. The box is now rigid.
- Roof. Stick foam tape along the top plates. Roof A (left) goes up first, 3 bolts down into the plates. Roof B next, its steel laps over A. 3 bolts down, 2 at the seam.
- Inside. Door on its lift-off hinges. Divider slides into its floor and ceiling channels. Nest units hook onto the back walls. Perches, feeders, water.
- Flight pens. Each half hooks onto the front wall at floor height and stands on its two front legs on blocks, 2 bolts. Line the pop holes up.
- Anchors. Screw the 4 augers in at the corners, clip the cables to the eye bolts in the leg feet, pull them snug.
- Check. Push every corner. Nothing should rock. Close the vents to winter setting if it is cold. Birds in.
Taking it apart
Reverse order, same bolts. Number every panel with a marker and number the matching bolt holes, keep the bolts in a jar with a label. The stack is 4 ft by 6.5 ft and about 2.5 ft tall. Stand it against the garage wall under a tarp.
Building the panels (the carpentry part)
Weekend 1: floor halves, all six wall frames, outer plywood. Weekend 2: cut the openings, foam, inner skins, roof halves, door. Weekend 3: flight pens, divider, nest boxes, paint, then a full test fit in the yard before any bird moves in. Pre-drill every bolt hole with the panels clamped together in their final position, that is what makes the yard assembly quick.
Shopping list
Two paths. "All new" is Home Depot and Rona prices. "Budget path" is what the same build costs if you get lumber, plywood, foam offcuts and used coroplast signs on Facebook Marketplace, which is normal in Edmonton. Both before GST.
| Item | Qty | Each | Line |
|---|
Ways to cut more: rip 2x4s into 2x2s on a table saw (halves the framing cost), 7/16 OSB instead of 5.2 mm plywood outside (about $70 less but each wall gains 15 lb), one flight pen half now and the second later.
Cut list
All in inches. Frames are 2x2 unless it says 2x4. Foam gets cut to fit each bay after the frame is together.
Floor half (make 2)
- 2x4 @ 48: 4 (joists, two are the outside rims)
- 2x4 @ 33: 2 (end rims)
- 1/2 ply 36 x 48: 1
Legs (make 2)
- 2x4 @ 32 1/2: 8, two per corner screwed into an L
- 2x4 @ 36: 2 and 2x4 @ 41: 2, top rails on edge
- 2x2 @ 42: 4 diagonal braces, one on every side
- Eye bolt in each foot for the anchor cable
- Door stair: 2x10 @ 36: 2 stringers cut for two 18 inch risers, 2x10 @ 24: 2 treads
Back wall panel (make 2)
- 2x2 @ 63: 3 studs
- 2x2 @ 36: 2 plates
- 2x2 @ 15 3/4: 2 blocking
- 5.2 mm ply 36 x 66 outside, coroplast 36 x 66 inside
- Vent slot 2 x 30 at the top, wire plus a sliding cover
Front wall panel (make 2)
- 2x2 @ 75: 3 studs
- 2x2 @ 36: 2 plates
- 2x2 @ 15 3/4: 2 blocking
- 5.2 mm ply 36 x 78 outside, coroplast inside
- Both: pop hole 8 x 8 at the floor with a slide, vent slot 2 x 30 at 6 in up
- Left: window 18 x 24 (clear acrylic or a roofing offcut), sill at 40 in
- Right: trap opening 14 x 9 at 58 in, landing board 24 x 14, drop door above
Side wall (make 2, mirror)
- 2x2 studs @ 75 (front), 69 (middle), 63 (back)
- 2x2 @ 48 bottom plate, 2x2 @ 49 1/2 top plate with 14 degree ends
- 2x2 @ 21: 2 blocking
- 5.2 mm ply 48 x 78, trim the slope after
- Right side only: door opening 24 x 60, add 2x2 @ 60: 2 and 2x2 @ 24: 1 around it
Door
- 2x2 @ 57: 2, 2x2 @ 21: 3
- 5.2 mm ply 24 x 60 outside, coroplast inside, foam between
- 2 lift-off hinges, 1 barrel bolt inside, 1 hasp outside
Roof half (make 2)
- 2x4 @ 60: 3 rafters
- 2x4 @ 39: 2 rims
- 2x2 @ 39: 3 purlins across the top
- Steel 26 x 60: 2 per half (cut 8 ft panels), the right half's steel sticks out 2 in to lap
- Foam between rafters, coroplast 42 x 60 underneath
Flight pen half (make 2)
- 1x2 @ 36: 4, 1x2 @ 27: 4, 1x2 @ 45: 4 posts
- 2x2 @ 36: 2 front legs, on blocks
- 1/2 inch hardware cloth on all six sides, floor included, stapled every 2 in
- Top panel hinged so you can reach in
- 2 hooks to the front wall, 2 bolts
Divider and nest units
- Divider: 1x2 @ 72: 2, 1x2 @ 44: 3, wire, with a small pass door. Slides into U channels screwed to the floor and ceiling
- Nest unit (make 2): 1/2 ply 36 x 20: 2 (top, bottom), 12 x 20: 4 (ends and dividers), 36 x 6: 1 lip. Hooks onto the back wall
Edmonton rules
From the City's Animal Care and Control Bylaw 21244 (in force May 19, 2026) and Zoning Bylaw 20001. Confirm with 311 before you build, the City can add conditions to the licence.
Pigeons (section 35)
- You need a pigeon licence. $16 for 2026, $17 in 2027. Keeping pigeons without one is a $100 fine
- Maximum 75 pigeons on the property
- The loft has to be acceptable to the City for location, size, construction, ventilation and cleanliness. Keep it clean and they have no reason to say no
- Birds outside the loft only for supervised exercise, or coming home from a race or training toss
- Never more than 20 out at once
- No flying Sat, Sun or holidays 10 am to 11 pm, and no flying any day May to September 10 am to 4 pm
- Each of those is a $100 fine
- Nothing in the bylaw about breeding or selling your own birds. The City can put conditions on a licence, so ask when you apply
The building (Zoning Bylaw 20001)
- An accessory building of 10 m² or less needs no development permit. This loft is 2.2 m²
- Back yard only, never the front yard
- Keep it 0.6 m (2 ft) from the rear lot line. The City's shed guide says 0.9 m (3 ft) from side lot lines and from the house, and one City page says 0.6 m, so use 3 ft and you are covered either way
- Roof midpoint must be under 4.3 m. On 3 ft legs ours is about 2.95 m at the midpoint and 3.1 m at the front, so keep the normal 0.6 m rear setback (the closer-to-the-line option only applies to roofs under 2.4 m)
- No permanent electrical, plumbing or gas. An extension cord for a heated bowl is fine
- Nothing is dug in or attached to the house, so it is a movable structure. That is your landlord's main worry, and the answer is it leaves with you
How this design answers the City's five words
Sources: Bylaw 21244, consolidated PDF (section 35, Schedule A fees, fine schedule); Zoning Bylaw 20001 section 7.120; City shed and garage page; snow load from NBC 2020 Appendix C as reported by loadcalculator.ca. Prices from homedepot.ca and rona.ca listings on Nov 4, 2026, which can be stale. Weights are calculated from material weights, not weighed.
Made for Mowlid, Nov 2026.